Generate PDF documents from your form responses
Whether you need to save, send or print a PDF copy of your form submissions, or generate entirely new documents containing your form submission data, our advanced PDF functionality can do what you need.
What can you do with PDF templates?
- Generate an exact PDF copy of your filled-in online form with responses included.
- Design a custom PDF document which can contain response data merged in.
- Upload a fillable PDF template that our system can automatically fill in with answers from each form response.
What can you use this for?
- Attach PDF documents to email notifications and confirmations.
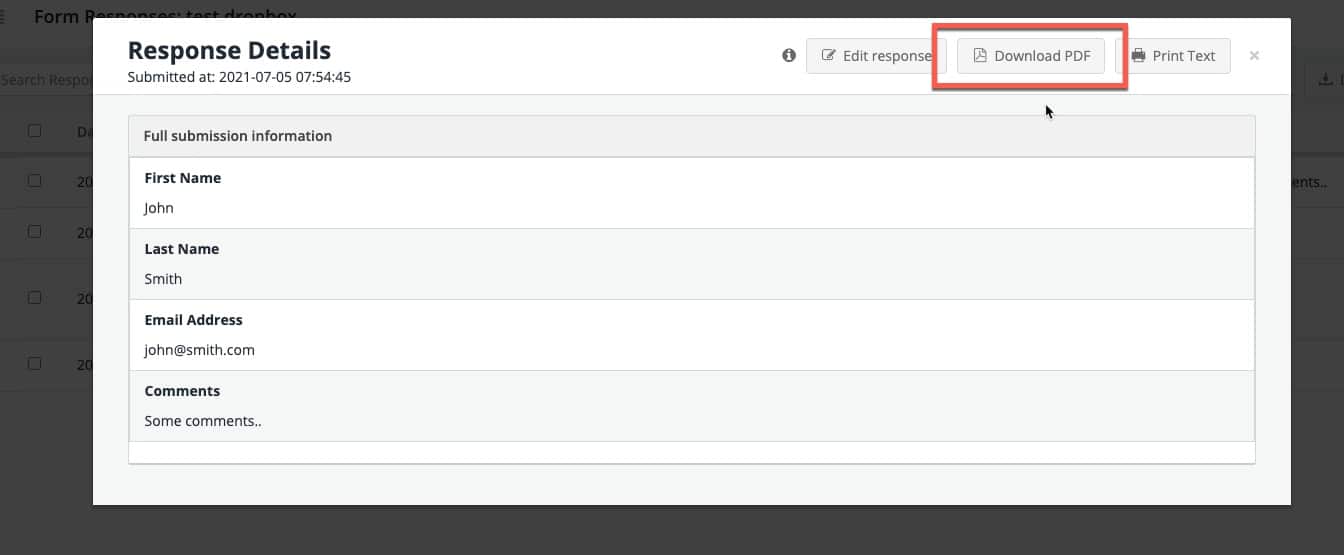
- Download PDF documents when viewing or managing form responses within Snapforms.
- Send PDF documents automatically to your other systems and cloud services using one of our integrations.
How to set up PDF templates
1. While editing your form there are a number of places you can choose to attach a PDF document. These include notification emails, workflow emails and some of the integrations. Start by ticking the box to attach a PDF document in the relevant settings area. The below screenshot shows the notification email settings.
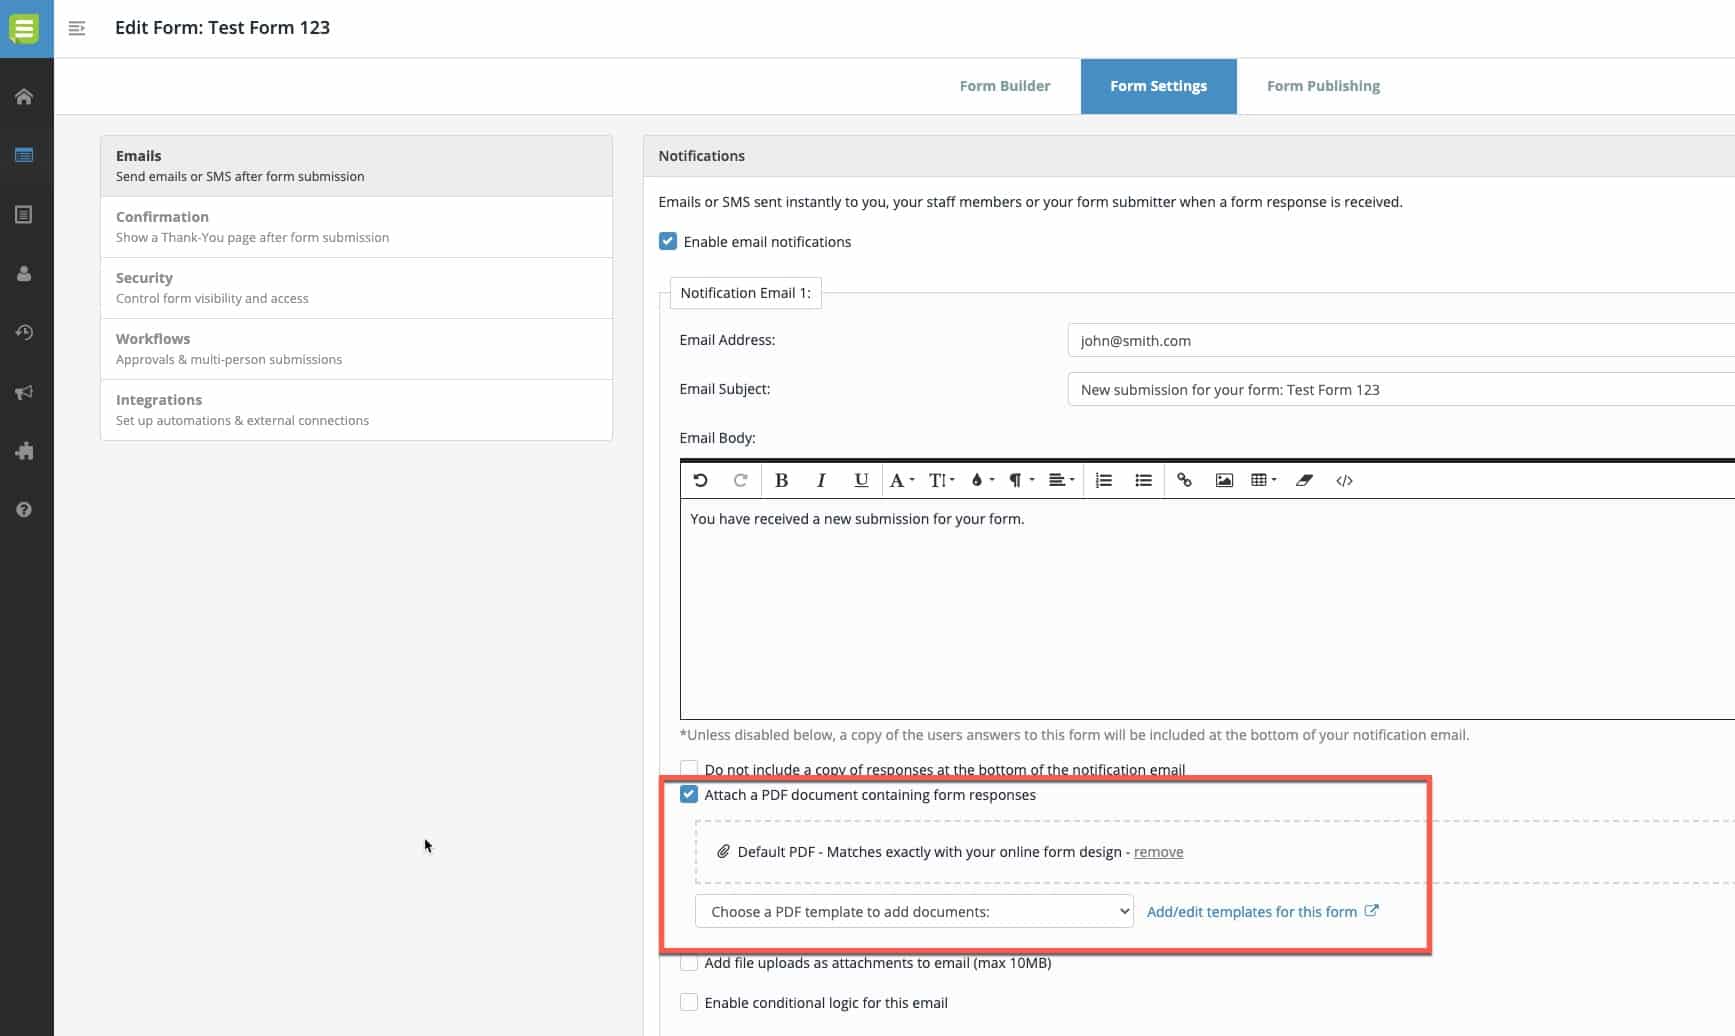
2. By default the PDF that will be attached looks exactly like your online form. The answers from the relevant form response will be populated in the fields.
If you do not need to customise this, you can leave everything as it is here and the rest of the guide does not apply to you.
Customising the PDF attachments
If you need to customise the default PDF, design your own PDF document from scratch or use a pre-made fillable PDF instead, click ‘Add/edit PDF templates for this form’.

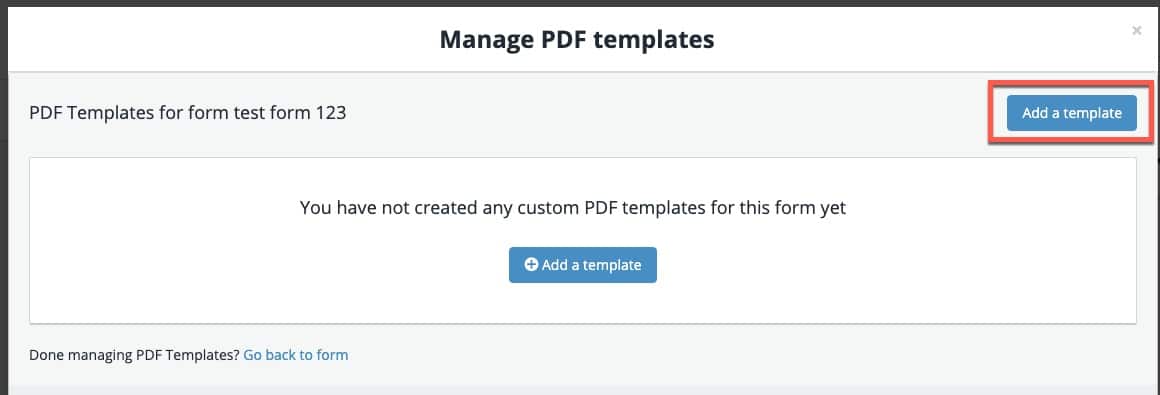
3. A window will appear that will allow you to manage templates for this form. If this is your first time adding templates for this form, your template list will be empty. Click ‘Add a template’ to get started.
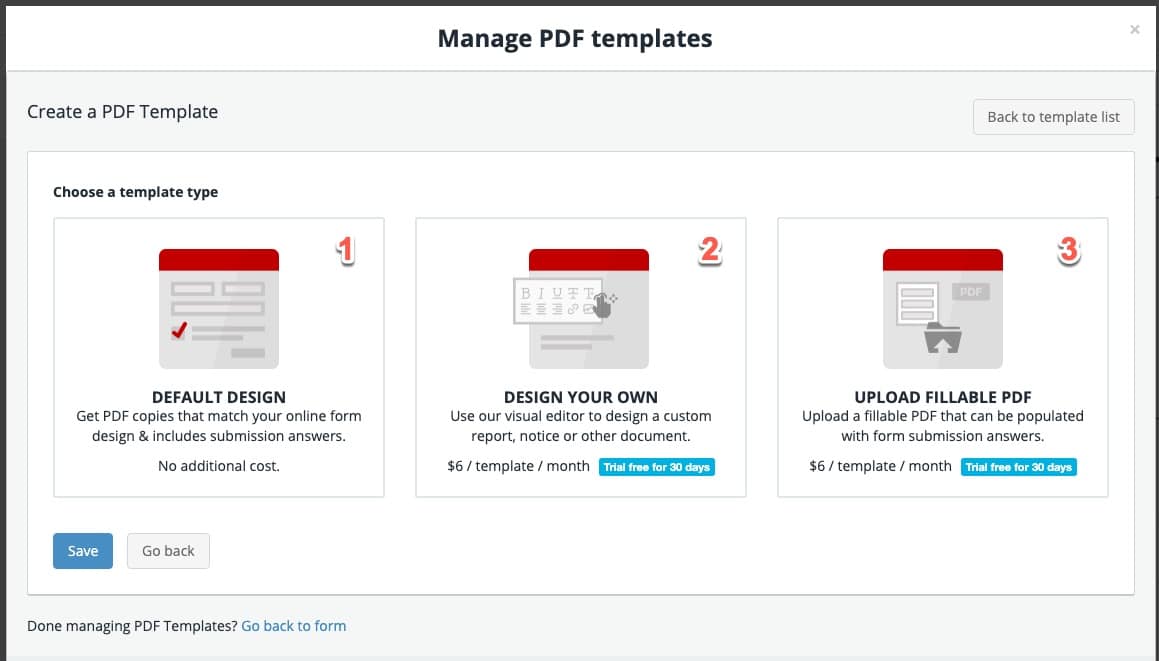
4. You’ll need to choose what type of template you’d like to create from the below options.
- Default design (no additional cost): By default the PDF design matches exactly with your online form. If you wish to make some customisations to the default PDF design choose this template type.
- Design your own ($6 / month): If you wish to create your own document design using our visual editor choose this template type. There will be an additional cost of $6 per template added to your account after a 30 day free trial period where you can try the template.
- Upload fillable PDF ($6 / month): If you wish to upload a pre-made fillable PDF document that can be automatically populated with form response answers choose this template type. There will be an additional cost of $6 per template added to your account after a 30 day free trial period where you can try the template.
5. After you choose a template type the relevant options will appear for that template type.
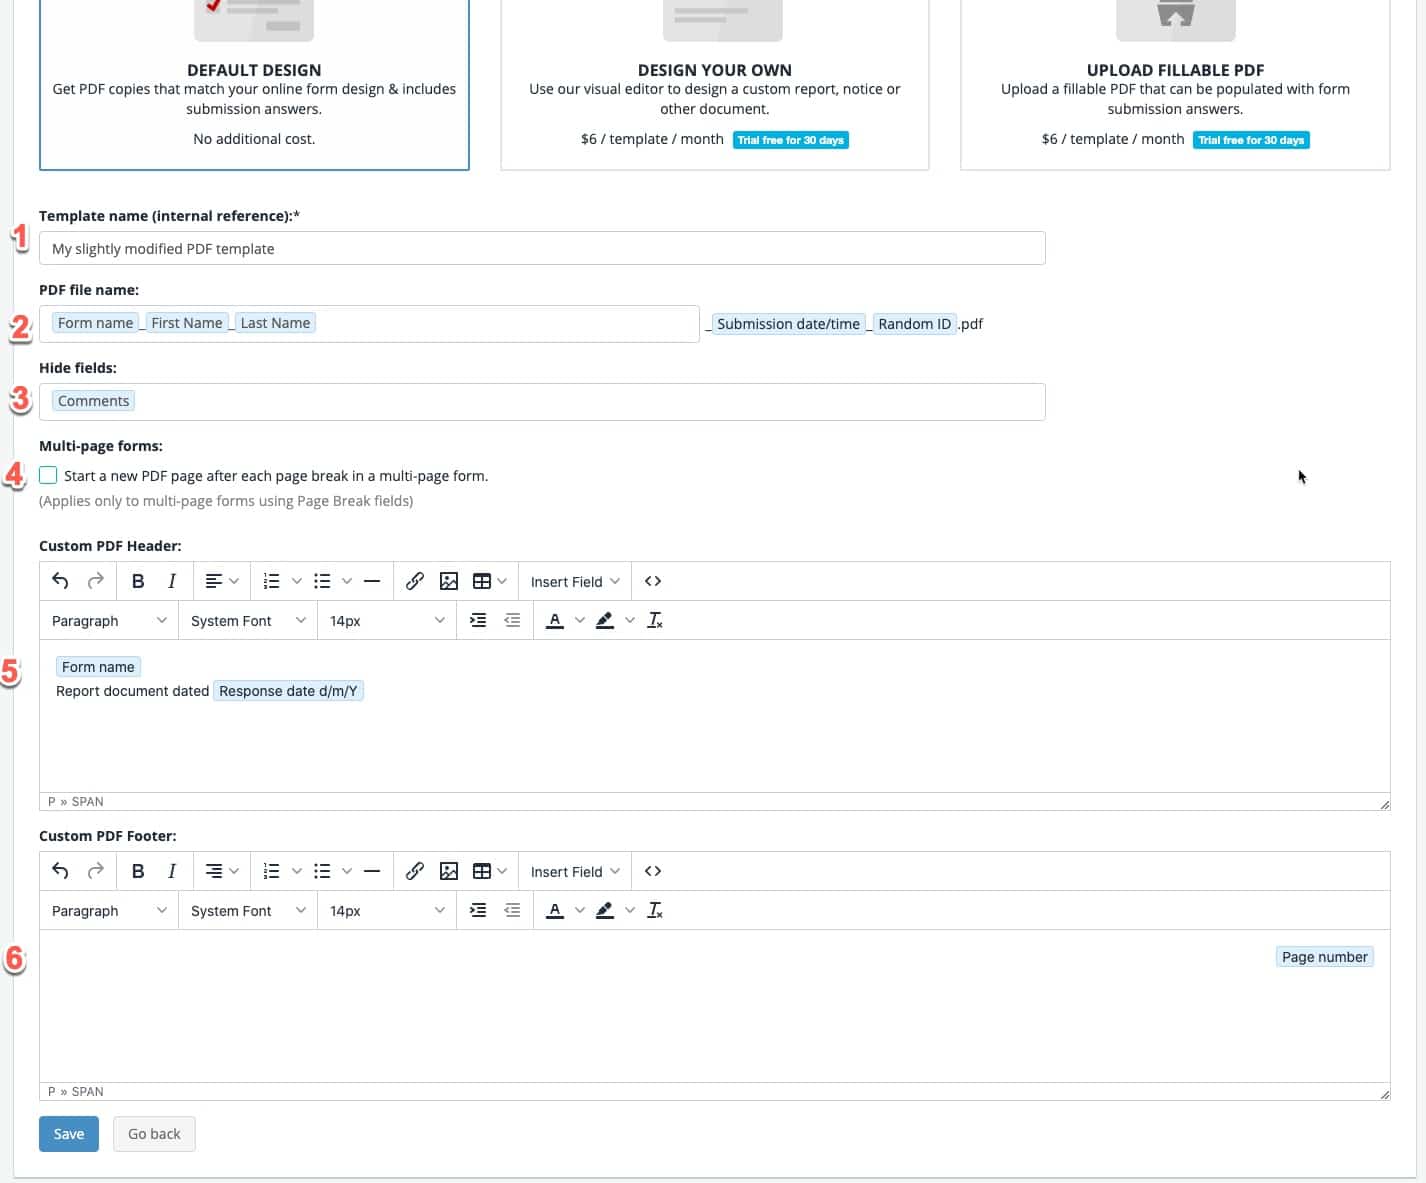
Options for the ‘DEFAULT DESIGN’ template type:
- Template name: Give your template a name so you recognise it when assigning a template to an email or integration.
- PDF file name: This is the file name of the PDF that will be generated. You can enter your own text here or insert dynamic form field answers that will populate based on each form response. The submission date/time and ID will always be appended to the end of the PDF file name. Leave this field as it is if you do not need to customise the PDF file name.
- Hide fields: If there are some fields on your online form that you do not wish to show in the PDF document, insert them here. Leave this blank if you don’t need to use this.
- Start a new PDF page for each page break: If you have a multi-page online form that uses Page Breaks, you can tick this box to have the PDF split pages for each Page Break in your online form.
- Custom PDF Header: If you need to add a header to every page of your PDF (such as a logo, title or other information) you can do this here. Leave this blank if you don’t need this.
- Custom PDF Footer: If you need to add a footer to every page of your PDF (such as a page number, document number or other information) you can do this here. Leave this blank if you don’t need this.
Note: For each option you can use the ‘Insert Field’ button to insert dynamic content that will be replaced with answers or information from a particular form response. This may include the submitter’s name or phone number, or the date and time of the form response.
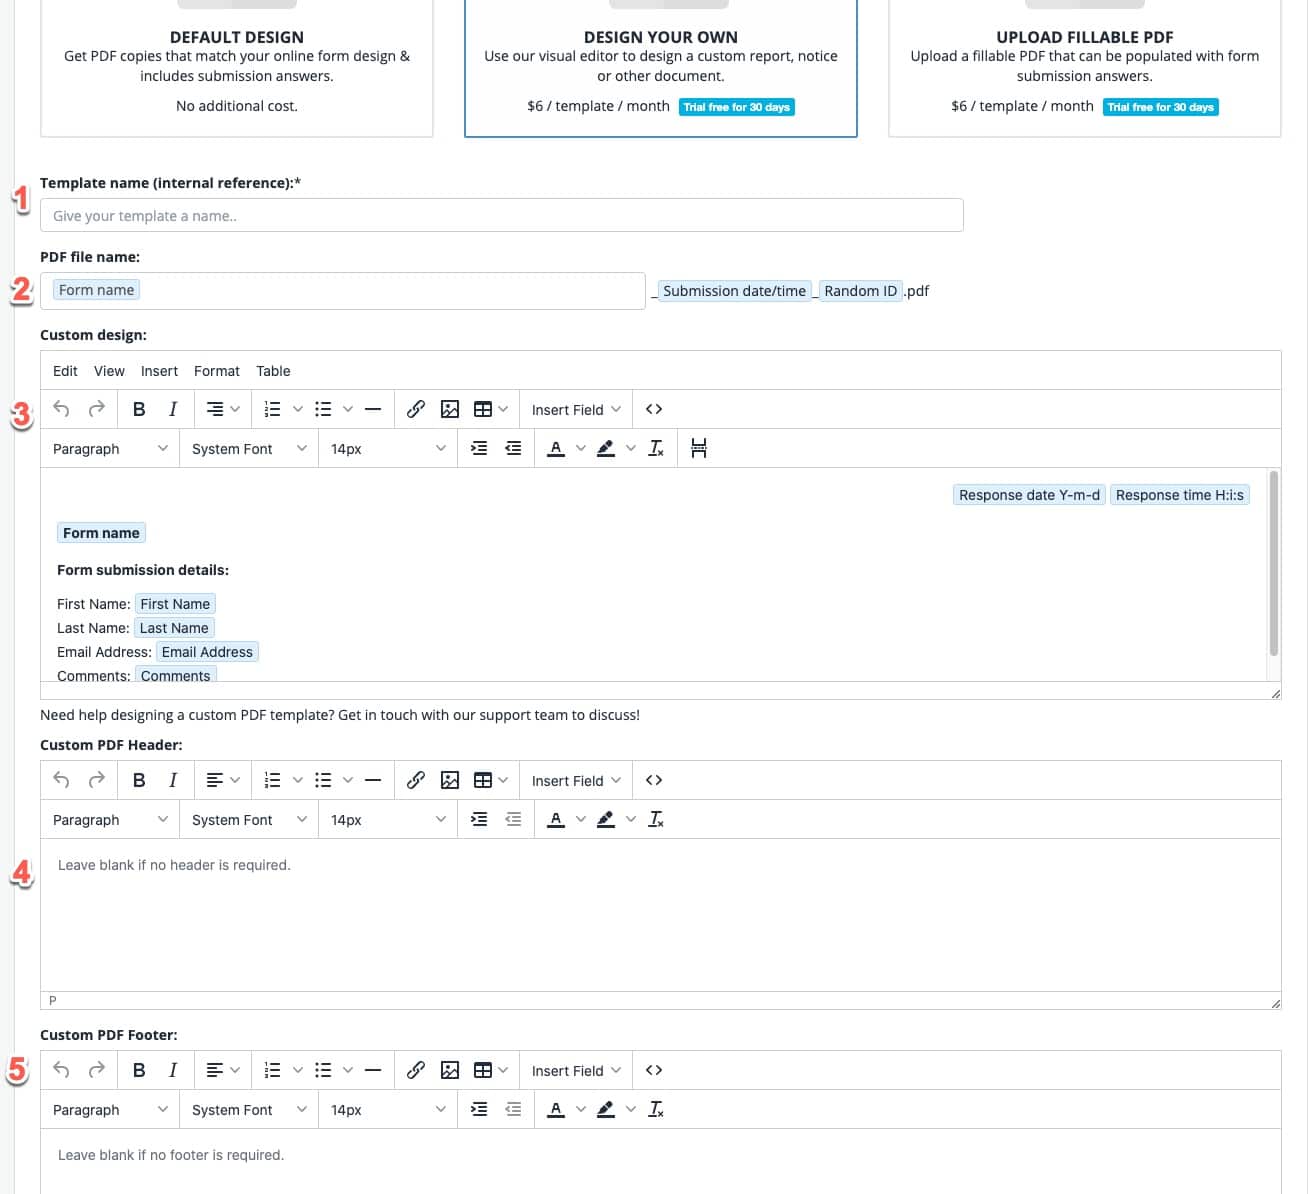
Options for the ‘DESIGN YOUR OWN’ template type:
- Template name: Give your template a name so you recognise it when assigning a template to an email or integration.
- PDF file name: This is the file name of the PDF that will be generated. You can enter your own text here or insert dynamic form field answers that will populate based on each form response. The submission date/time and ID will always be appended to the end of the PDF file name. Leave this field as it is if you do not need to customise the PDF file name.
- Custom design: This is where you can design the body of your PDF document. You may include text, images or answers and information from your form response.
- Custom PDF Header: If you need to add a header to every page of your PDF (such as a logo, title or other information) you can do this here. Leave this blank if you don’t need this.
- Custom PDF Footer: If you need to add a footer to every page of your PDF (such as a page number, document number or other information) you can do this here. Leave this blank if you don’t need this.
Note: For each option you can use the ‘Insert Field’ button to insert dynamic content that will be replaced with answers or information from a particular form response. This may include the submitter’s name or phone number, or the date and time of the form response.
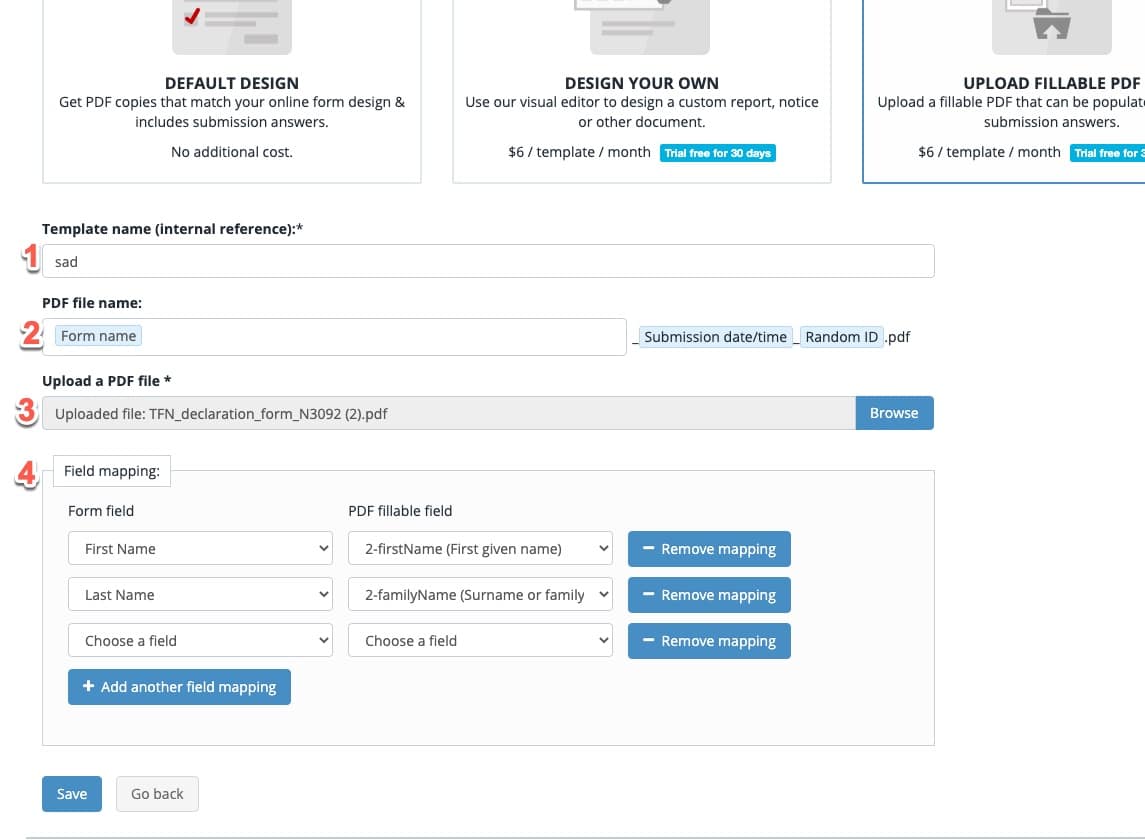
Options for the ‘UPLOAD FILLABLE PDF’ template type:
- Template name: Give your template a name so you recognise it when assigning a template to an email or integration.
- PDF file name: This is the file name of the PDF that will be generated. You can enter your own text here or insert dynamic form field answers that will populate based on each form response. The submission date/time and ID will always be appended to the end of the PDF file name. Leave this field as it is if you do not need to customise the PDF file name.
- Upload a PDF file: Upload your existing fillable PDF file. This could be a PDF file you created yourself or a document provided by another organisation.
- Field mapping: If your uploaded PDF document contains fillable fields, you’ll be able to map each field to a field in your online form. Mapped fields will be automatically populated when a PDF is generated after a form submission is received.
6. Click SAVE to save your template. Your template list for this form will be refreshed and your new template should appear in the list. Click ‘Go back to form’ to get back to your form settings.

7. Any PDF templates you’ve created for this form will appear in the template drop down list within the Email or Integration settings.
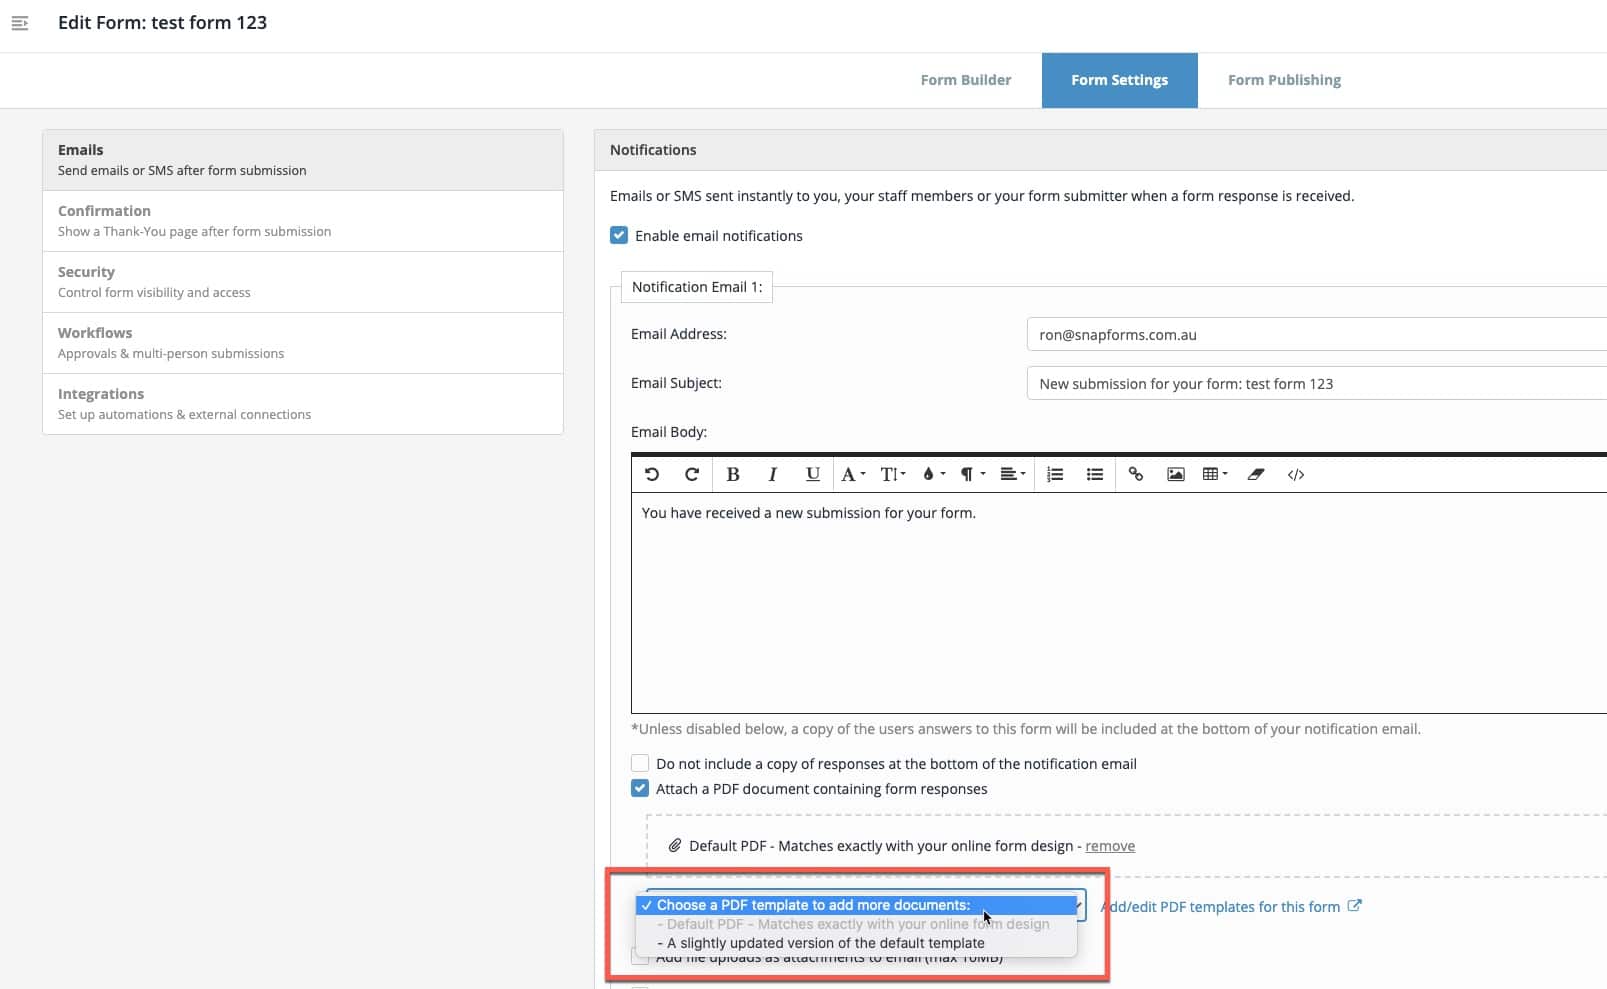
8. Select it from the drop down to add it to the documents that will be sent as part of that particular email or integration.

9. As shown in the image below, you may wish to choose a different PDF template to send for every email and integration you have set up in your form. You can also include multiple documents for each email or integration.
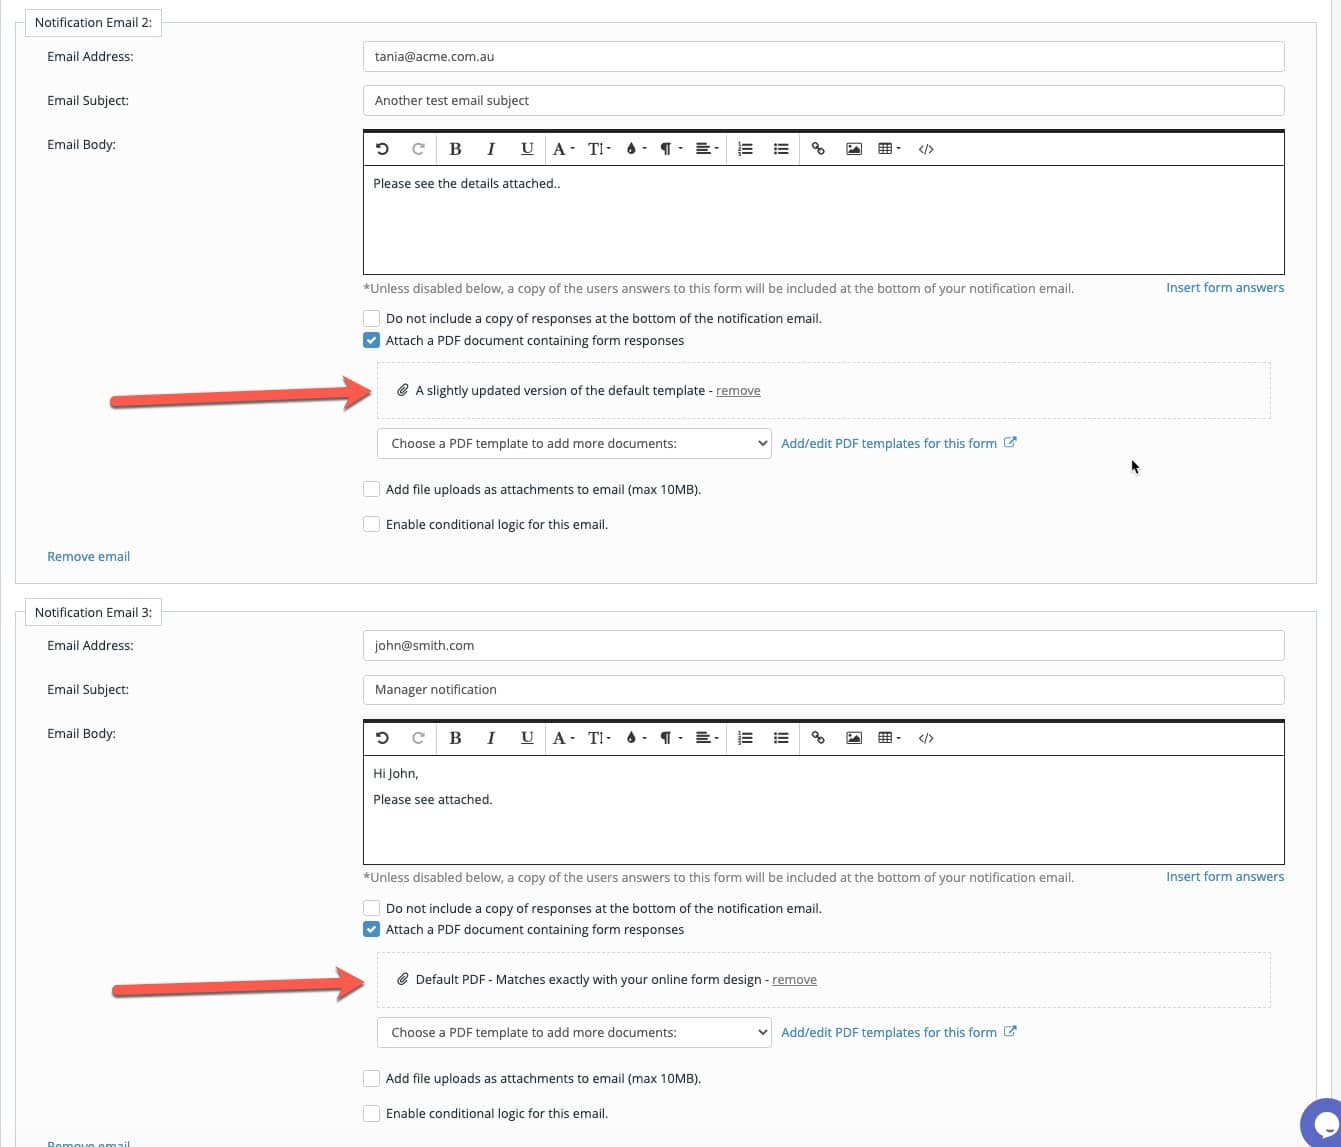
Whether you’ve left the ‘Default PDF’ selected or modified and added your own template, your form will now generate a PDF document each time you receive a form response and the document will be sent as part of the relevant emails or integrations.
You can also download a copy of a PDF document for any form response by visiting the ‘View Responses’ page, then viewing a particular form response and clicking ‘Download PDF’.
