Salesforce Integration
The Salesforce integration allows you to create and edit Salesforce records automatically using the details from your submitted form responses.
This is a direct integration between Snapforms and Salesforce and is an alternative to the more flexible approach of using our Microsoft Power Automate connector to connect Snapforms and Salesforce.
How does the Salesforce integration work?
- Once a user submits a completed form, it gets automatically synced with the relevant Contact, Account or other type of record in Salesforce.
- Is it a new Contact, Lead, Case or other object type? No problem! Once a user submits your form, a new record will be automatically created in Salesforce with all the details from your form filled in.
- For existing records, you’ll find a PDF copy of the form automatically attached in Salesforce. You can also have existing records updated with information from your form.
Start with an online form
Before you can integrate with Salesforce – you need to set up your online form in Snapforms.
Whether you have a brand new data collection idea or you’re already using some paper and PDF based forms, we can help you get up and running with an online form in minutes.
We recommend you check out our 10-minute getting started video or have a look through our written resources and guides to set up your form.
If you have an existing paper or PDF form and you prefer our team create a draft for you to try out, please send us your form and we’d be happy to help!
Enable the Salesforce integration
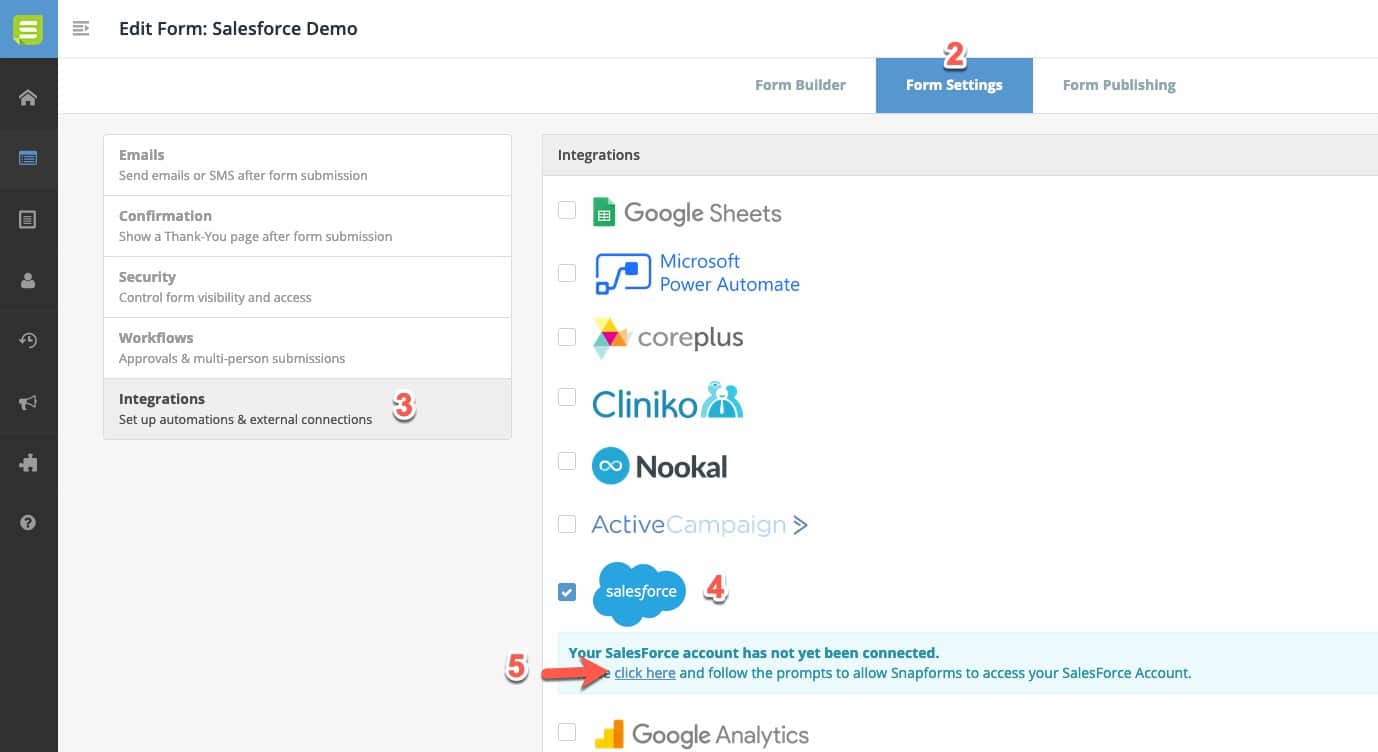
1. Head over to Snapforms and edit your form. This guide assumes you’ve already created your online form using the drag-and-drop form builder. If you haven’t done this yet please follow these steps to set up your form first.
2. In your form edit screen head over to the Form Settings tab.
3. Click the Integrations tab.
4. Tick the box to enable the Salesforce Integration.
5. If you haven’t yet authorised the connection between Snapforms and Salesforce, click the link to begin this process.
Authorise with your Salesforce account
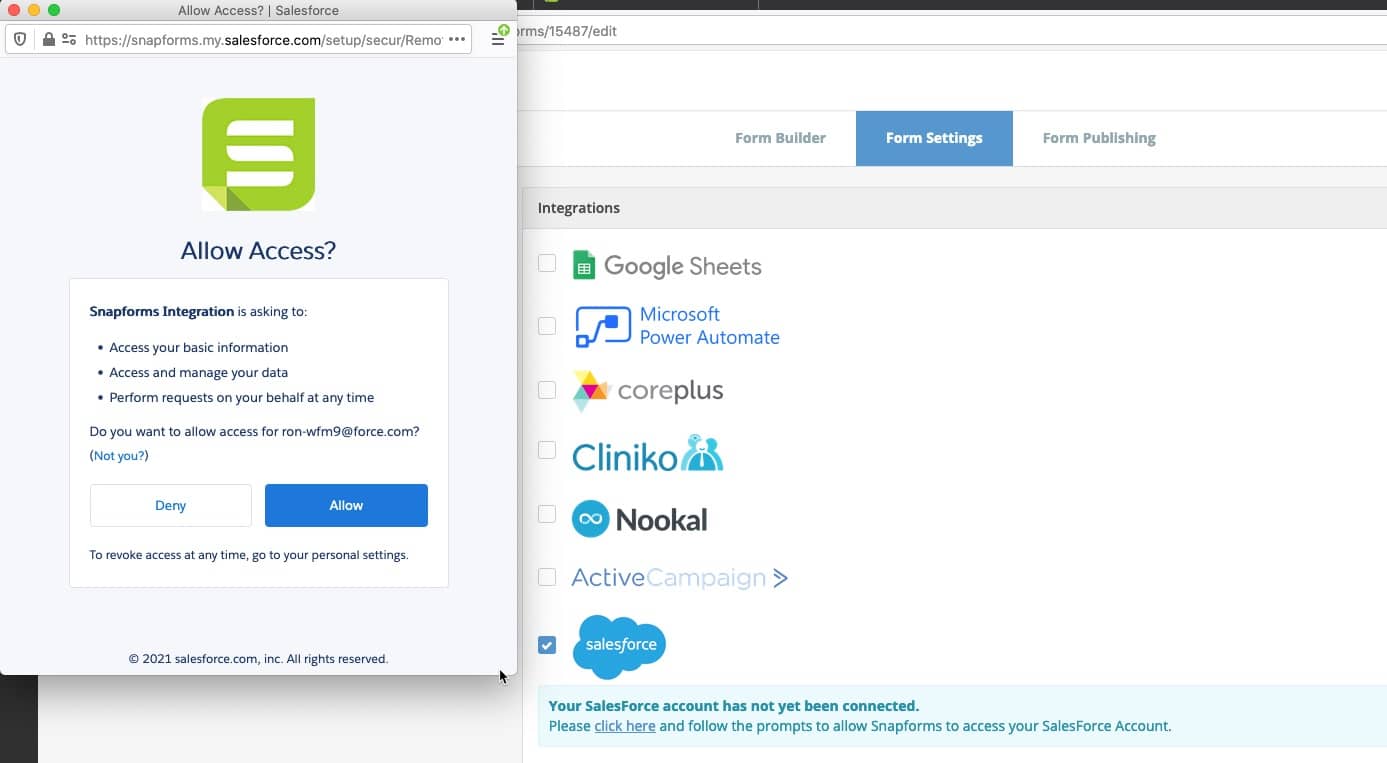
If this is your first time setting up a Salesforce integration in your Snapforms account, you’ll need to follow these steps to make the connection.
From the popup that appears, log in to your Salesforce account and click Allow to grant access. Wait a few seconds for this action to complete and the popup window to close.
Configuring the Salesforce Integration
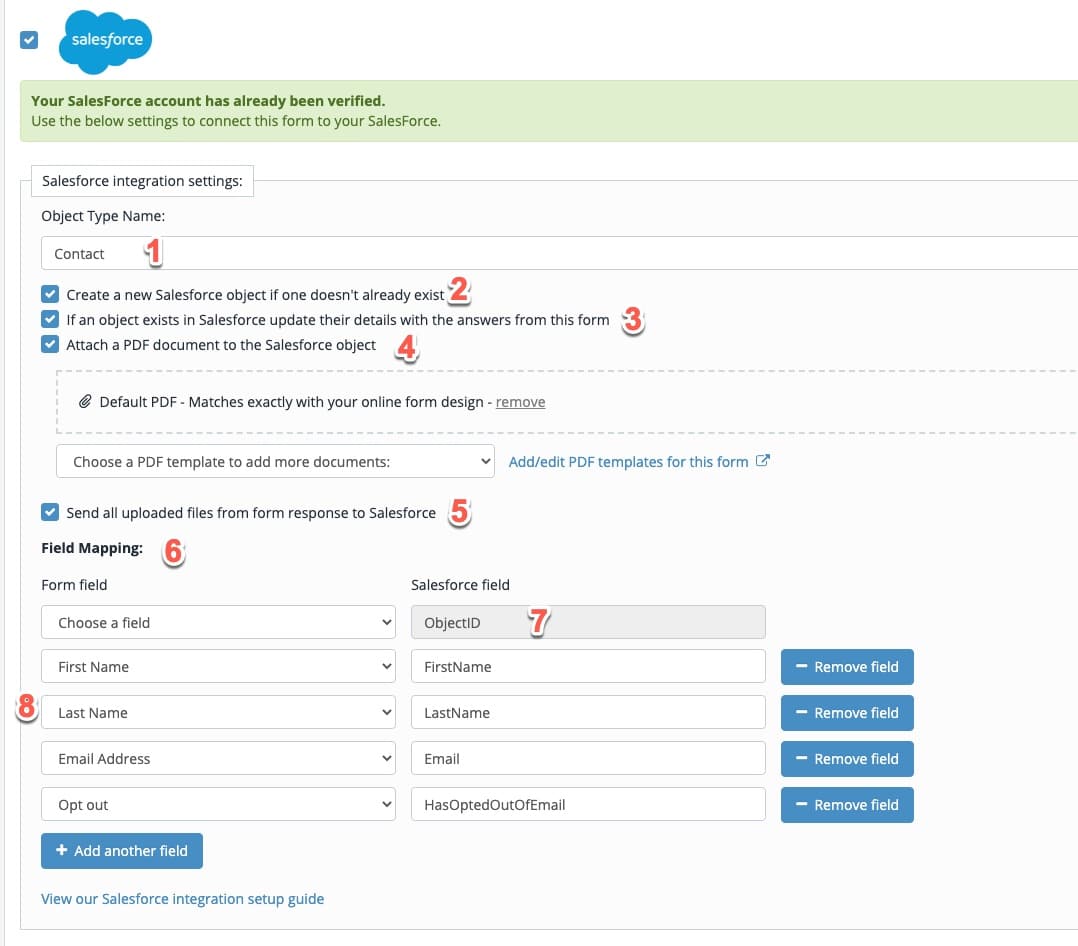
Once you have successfully enabled and authorised the integration you’ll see the relevant integration settings (as per the screenshot below).
1. Enter the Object Type Name for the Salesforce object that this integration should work with (e.g. ‘Contact’ or ‘Account’).
NOTE: If you need to find the relevant object name you can log in to your Salesforce account and go to ‘Setup’ from the top right. In the ‘Quick Find’ box on the left type ‘Object Manager’ then click the ‘Object Manager’ link to see a list of all your Salesforce objects with their names.
2. Tick ‘Create new Salesforce object if one doesn’t already exist’ if this form should create new Salesforce records. New records will only be created if an existing one is not found.
3. Tick ‘If an object exists in Salesforce update their details with the answers from this form’ if this form should updating existing Salesforce records. Records will only be updated if you map the ObjectID field and a valid ObjectID is found.
4. Tick ‘Attach a PDF document to the Salesforce object’ if you want a PDF copy of the completed form to be attached to the ‘Notes & Files’ section of the record in Salesforce.
By default the PDF that will be attached looks exactly like your online form. The answers from the relevant form response will be populated in the fields.
If you do not need to customise this, you can leave everything as it is here.
If you need to customise the default PDF, design your own PDF document from scratch or use a pre-made fillable PDF instead, click ‘Add/edit PDF templates for this form’ and follow the instructions in the PDF templates guide.
5. Tick ‘Send all uploaded files from form response to Salesforce’ if you want all files uploaded to a File Upload field to be automatically sent to the Salesforce record.
6. Using the Field mapping settings you need to map your form fields with the relevant Salesforce object fields.
7. The ObjectID mapping is critical if you want Snapforms to be able to find existing records in Salesforce and edit/add PDF files to them. If using this option you need to map this field to a field on your form that will contain the Salesforce Object ID. You can also leave it blank if you only need to create new records.
8. The rest of the mappings are used to map fields on your form with salesforce object fields when creating/editing a record.
Click ‘Add another field’ to map more of your form fields with Salesforce record fields. The more fields you map, the more information will be filled in the Salesforce record if a new one is created or an existing one is updated.
NOTE: If you need to find the relevant field names in Salesforce you can log in to your Salesforce account and go to ‘Setup’ from the top right. In the ‘Quick Find’ box on the left type ‘Object Manager’ then click the ‘Object Manager’ link to see a list of all your Salesforce objects with their names. Click the relevant object and then click Fields & Relationships to see the field names for that object.
9. Once done, Save your form using the Save button in the top right.
Once you’ve completed the above steps, your form responses will start to automatically sync with Salesforce.
Feel free to go ahead and give it a go!
TIP: Creating ‘Contact’ record types
When creating the ‘Contact’ record type it is required by Salesforce to map to at least the ‘FirstName’ and ‘LastName’ fields in Salesforce. This is shown in the screenshot above for reference.
TIP: Unable to find the uploaded PDF copy in your Salesforce record
If your integration logs indicate a PDF copy was successfully uploaded to Salesforce but you can’t see it in the Salesforce record, please ensure the ‘Files’ section is shown on the record layout.
TIP: Use logs to troubleshoot the integration
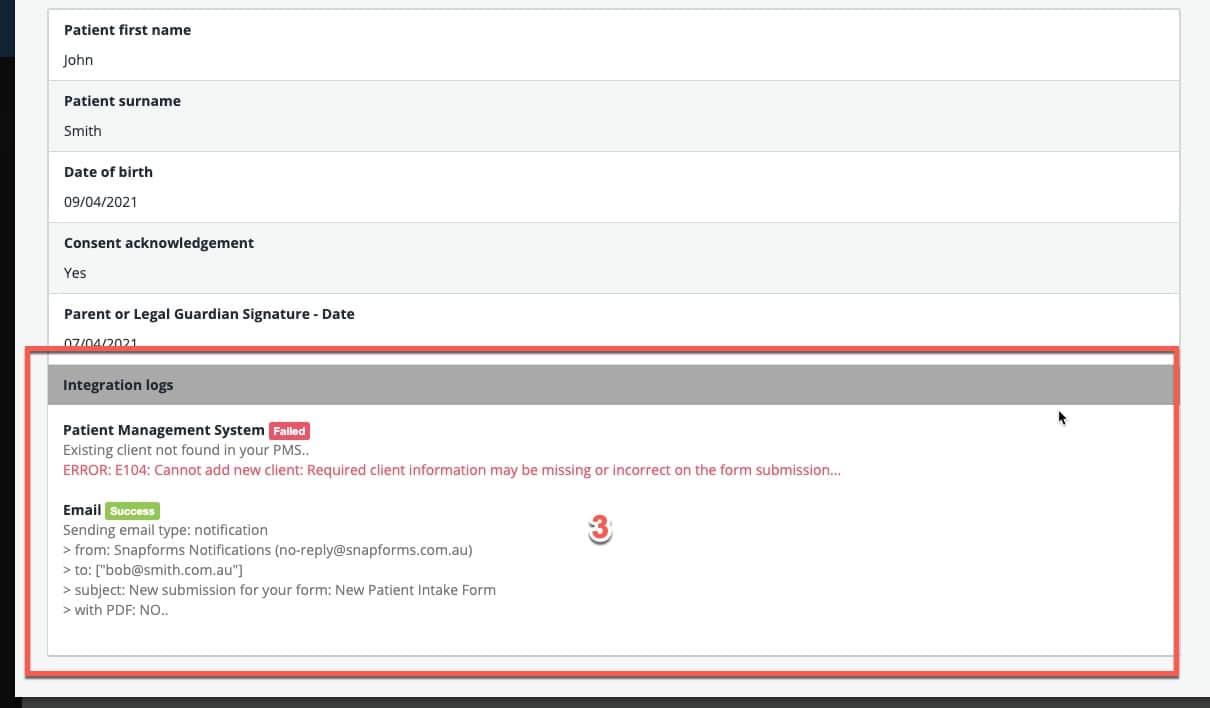
If you’re unsure whether your integration is working correctly you can check the integration logs for any form response.
To find these please follow the below steps:
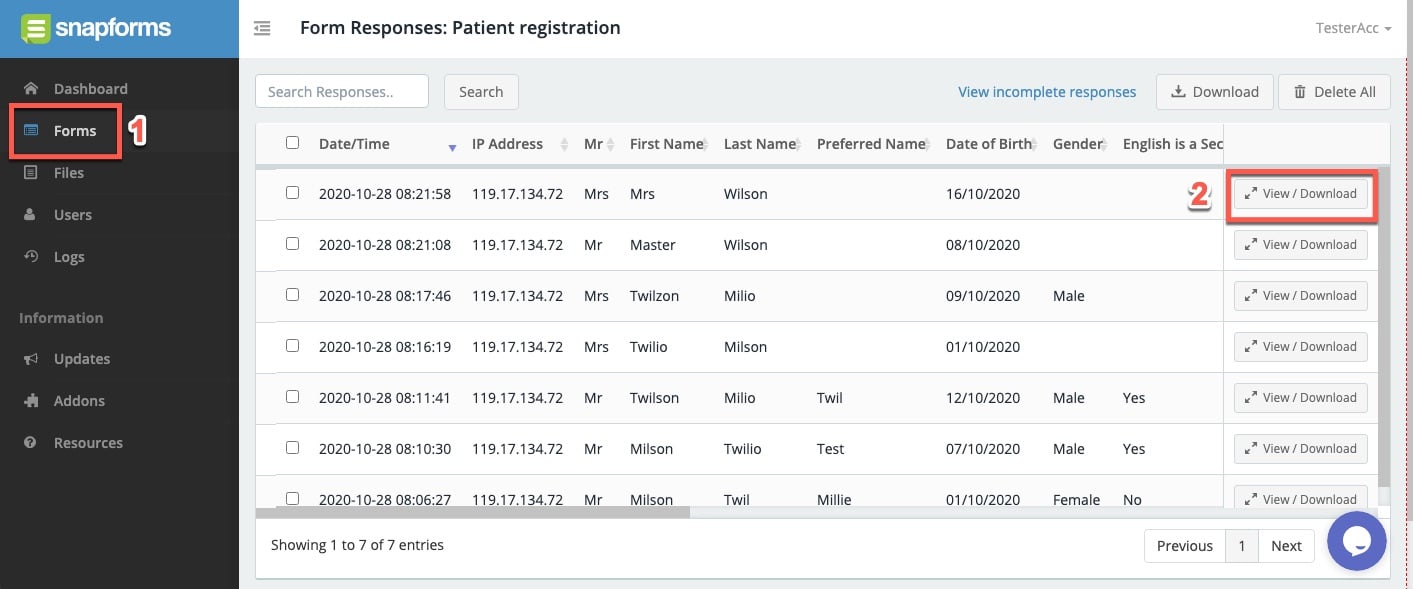
1. Click Forms in the left-hand navigation menu, then next to any of your forms click Actions -> View Responses.
2. Next to any of your form responses click View/Download.
3. Scroll to the bottom of the response details to see the integration logs if there are any integrations enabled.
