Set up an automatic export schedule
Set up an automatic export schedule to have your response data delivered straight to your inbox on a daily, weekly, or monthly basis.
To set up an automatic export schedule:
- Navigate to the Form Responses page via your Dashboard or the Forms list.
- (Optional) Customise the data you want to export using the filters at the top of the form responses table.
- Click the Export button, then select Export responses to CSV.
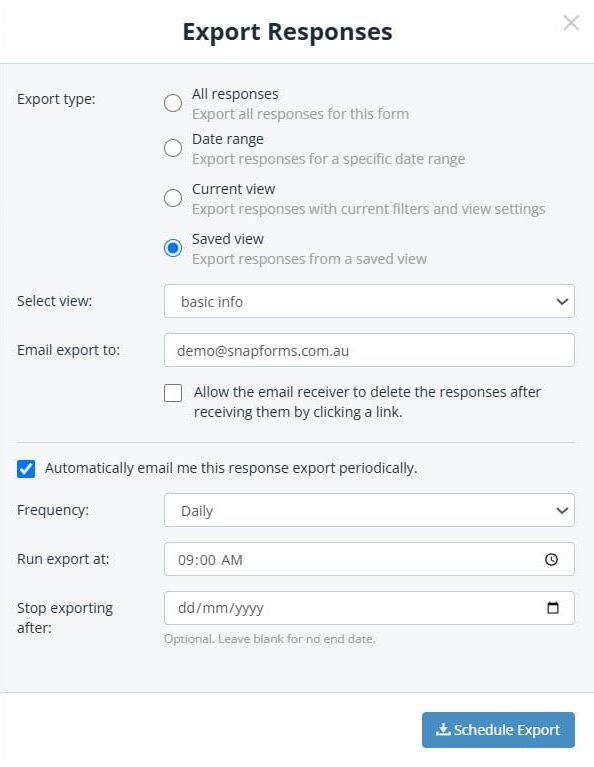
- Choose an export type:
- All Responses – exports all form responses.
- Date Range – exports form responses for a selected date range or custom range.
- Current View – exports form responses displayed in the current table view with filters applied.
- Saved View – exports form responses for the selected saved view.
- Tick the Automatically email me this response export periodically checkbox.
- (Optional) Change the email address if needed.
- (Optional) Tick the checkbox if you want to allow the email receiver to delete the responses after receiving them by clicking a link.
- Select the export frequency, e.g. Daily, Weekly, Monthly.
- (Optional) Select the time you want to export to run.
- (Optional) Select the date you want the export to stop, or leave blank for no end date.
- Click Schedule Export.

Manage scheduled exports
- From your Snapforms Dashboard, locate your form and select View Responses.
- Click the Export button, then select ‘Manage Scheduled Exports’.
- To delete a scheduled export, click Delete and confirm the action.
- To create a new scheduled export, click +Create Scheduled Export.
