
Halaxy Integration Setup
Snapforms allows clinics and allied health practitioners to create secure digital forms for patient registration, intake, referrals, signed consent, assessments and more.
With the Halaxy practice management integration, Snapforms can automatically add and update patient files in Halaxy using the information provided in your patients’ form responses.
How does the Halaxy integration work?
- When a patient submits a completed form, it’s automatically synced to their file in your Halaxy account.
- Got a new patient? No problem! When the create a new patient action is enabled, submitting an intake, registration or referral form creates a new patient file in your Halaxy account with their details filled in.
- Existing patient files can also be updated from a connected form, when the update their details action is enabled.
- For both new and existing patient files, a PDF copy of the form is saved to their Halaxy patient file when the attach a PDF action is enabled.
You switch these three actions on per form, so you decide what any given form does. They’re covered in Halaxy integration actions explained below.
Before you start
What you need in Snapforms
The Halaxy integration is included on every Snapforms plan and works throughout the 30-day free trial, so there’s nothing extra to purchase from us.
This guide assumes you’ve already created your online form using the drag-and-drop form builder. If you’re new to Snapforms, we recommend you check out our 10-minute getting started video or have a look through our help guides to learn how to set up your form.
What you need in Halaxy
API keys are only available to Halaxy accounts with an active Halaxy API subscription. At the time of writing Halaxy lists this as a monthly add-on costing 150 credits per month, free of charge for the first 30 days. Halaxy sets and can change that price, so please confirm the current cost in your own account before you subscribe.
To subscribe, in Halaxy click Settings > Add-ons, then under Group Add-ons click Add a Subscription and purchase Halaxy API. Halaxy’s own Guide to Halaxy API covers this in full.
What your form must collect
Halaxy identifies a patient by name plus one other piece of information, so your form has to ask for both before the integration can do anything. Check these before you go any further — they’re the most common reason a first test submission doesn’t sync.
- First name and last name as two separate questions. Halaxy stores them as separate fields, so a single “Full name” question can’t be mapped. If your form already has one, split it in two.
- At least one of date of birth, email, phone or mobile. One is the minimum. Mapping more of them gives Snapforms more ways to recognise a patient whose details in Halaxy are partly out of date — see how matching works for what it does and does not help with.
If somebody other than the patient fills in the form — a referrer, or a parent completing an intake for a child — the questions you map must still be the patient’s details, not the person filling it in. A referral form that maps the referring GP’s name and email will create or update a patient file for the GP. Where a form collects both, label the questions clearly (for example “Patient’s first name” and “Your first name”) so the right ones get mapped.
How to set up the Halaxy integration
Create an API key in Halaxy
You create the key yourself in Halaxy — there’s no need to request one from their support team. You will end up with three things:
- a Client ID
- a Client Secret
- the Region your Halaxy account is hosted in — either Australia / New Zealand / other, or EU / UK
In Halaxy:
- Click Settings > Integrations, then at the top click the External tab.
- On the top right, click Create New Key.
- Give the key a Name you’ll recognise later, such as Snapforms.
- Under Key Access, enable the Patients resource with the Retrieve, Create and Update functions. Snapforms only ever reads and writes patient records, so no other resource needs to be switched on. If you only want Snapforms to update patients that already exist and never create one, you can leave Create off.
- Click Save, then copy the Client ID and Client Secret straight away.
Note: Halaxy will not show the Client Secret again after you close that pop-up, and Snapforms stores it encrypted and never displays it either. A connection you have already saved keeps working, so there is nothing to do if you no longer have your own copy of the secret. You only need to create a new key in Halaxy — and save it in Snapforms as a new connection — if you have to set the connection up again, or if the key is deleted or revoked in Halaxy.
Connect your Halaxy account
- Open your form in edit mode and select the Form Settings tab.
- Select Integrations > Halaxy.
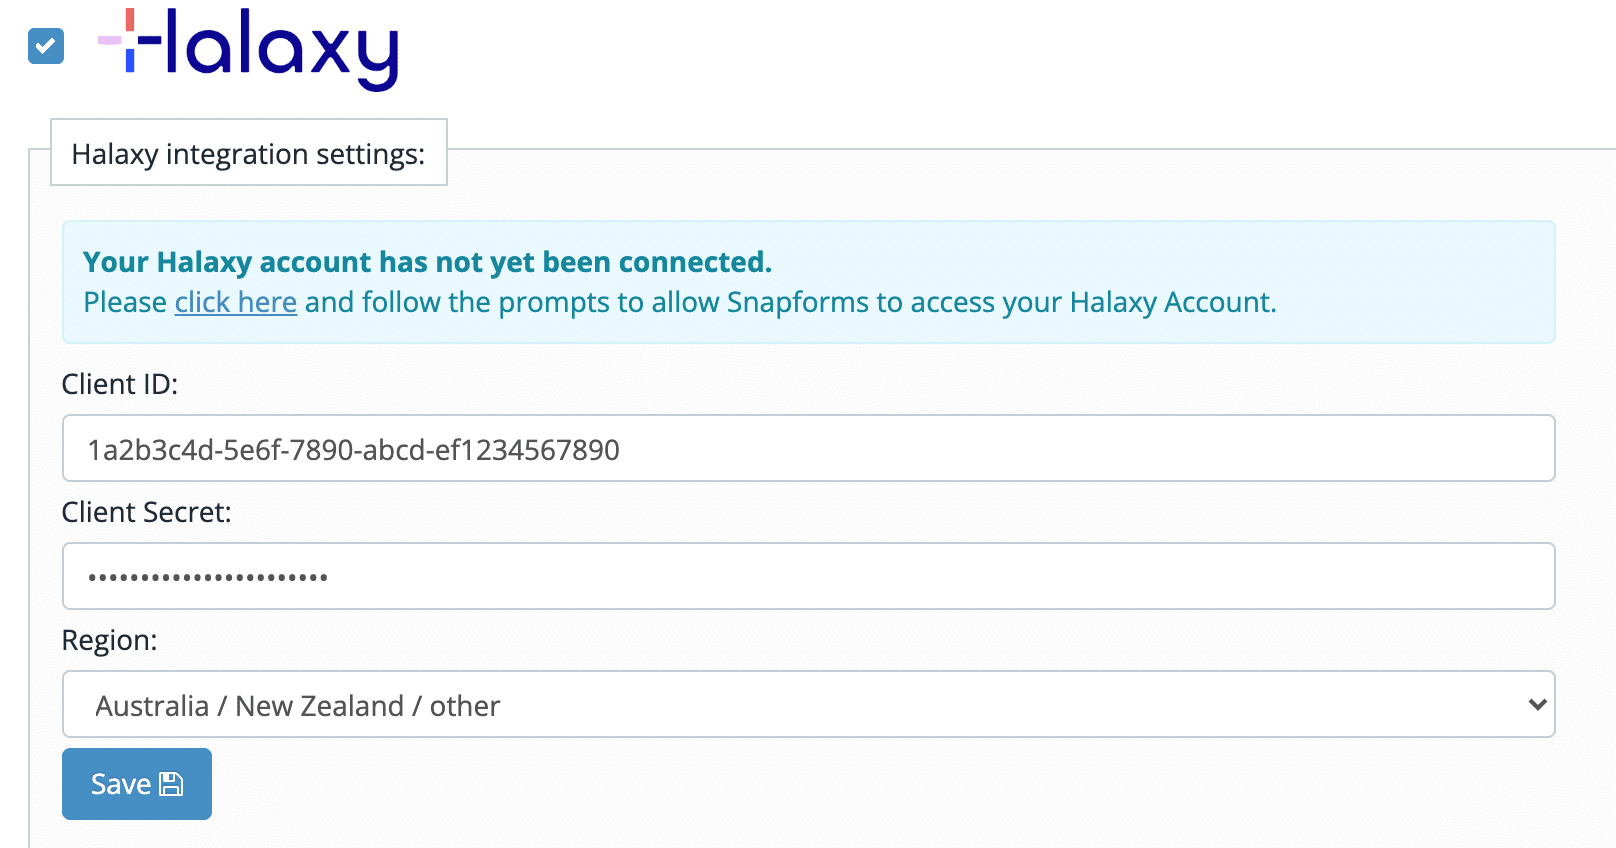
- If this is the first connection, click the click here link to display the connection fields.
- Enter your Client ID and Client Secret, choose your Region, and click Save. This connection is now saved to your account and can be used across different forms.
- Select the saved connection you want this form to use.
Configure the form integration settings
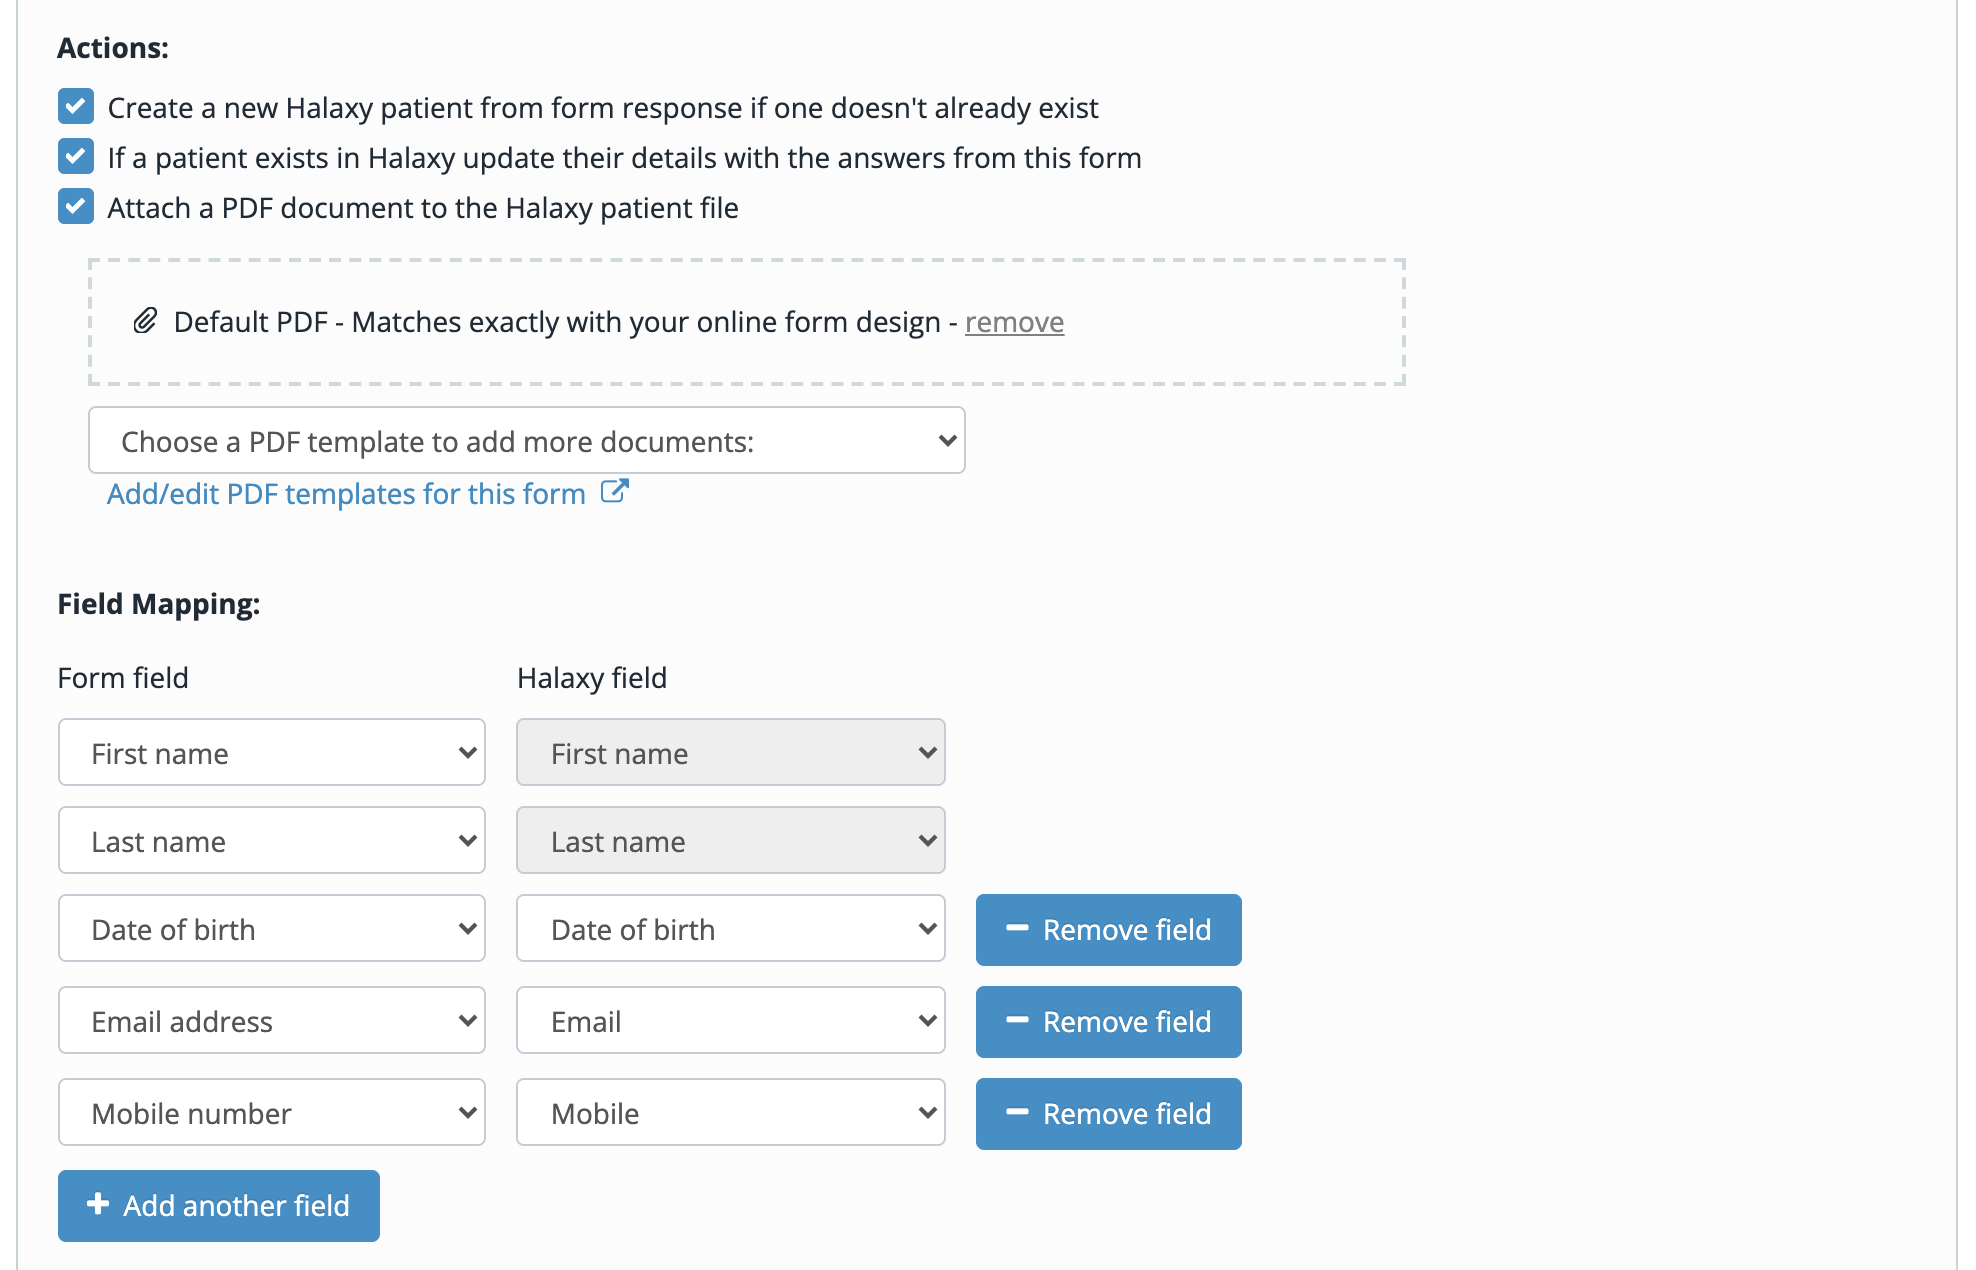
- Enable the integration actions you require.
- In the Field Mapping section, select the form fields that correspond with each of the Halaxy fields. Note: First name and Last name are required, plus at least one of Date of birth, Email, Phone or Mobile. Map any other fields you want written to the patient record.
- To add more field mappings, click Add another field, then select the form field from the list and map it to the corresponding Halaxy field.
- Once complete, scroll to the top and click Save.
Halaxy integration actions explained
| Action | Enable this if you want to… |
| Create a new Halaxy patient from form response if one doesn’t already exist | Create new patient files in Halaxy using the mapped fields from the form responses. |
| If a patient exists in Halaxy update their details with the answers from this form | Update existing patient files in Halaxy using the mapped fields from the form responses.
Only the fields your patient actually answers are written. A question left blank will not wipe the value already held in Halaxy. |
| Attach a PDF document to the Halaxy patient file | Attach a PDF document that looks exactly like your online form (including the responses populated within the fields) to the patient file in Halaxy.
If you prefer to design your own PDF template or use a pre-made fillable PDF, click Add/edit PDF templates for this form (blue link) and follow the instructions in the PDF templates guide.
|

Choose when the integration runs
By default, every submission of this form is sent to Halaxy. If a single form serves more than one purpose, you can set conditions on the integration so that only submissions that meet your rules are sent to Halaxy. Everything else is still captured in Snapforms.
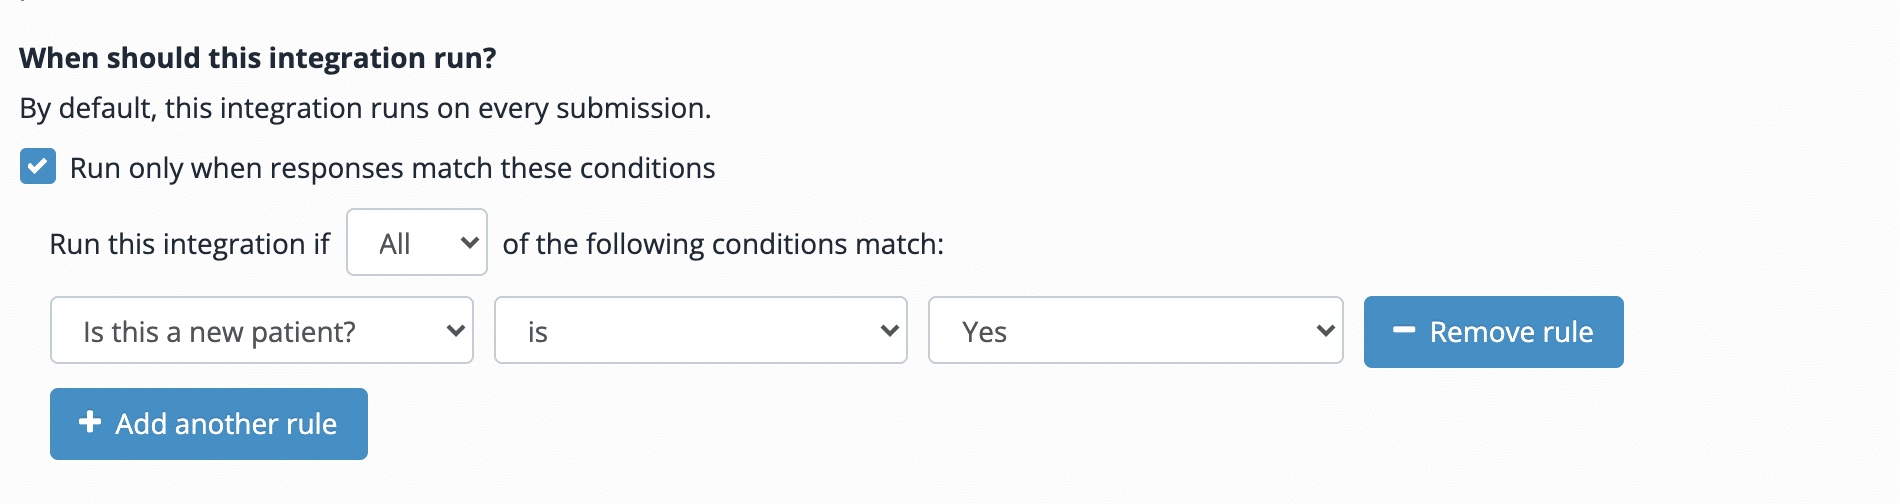
Underneath the field mappings, find When should this integration run? and tick Run only when responses match these conditions. Then:
- Choose whether All or Any of your conditions have to match.
- Pick the form field the condition looks at, the operator, and the value to compare against.
- Click Add another rule if you need more than one condition.
- Scroll to the top and click Save.
In the example below, a single intake form asks “Is this a new patient?”, and only the responses answering Yes are sent to Halaxy. Everyone else’s response is still captured in Snapforms, it just isn’t written to a patient file.
Tip: if a response you expected to sync has no integration log against it at all, rather than a failed one, a condition here is usually the reason.
Send a test submission
Before you share the form with patients, submit one yourself and confirm it landed where you expect.
- Open your form’s live link and complete it as a patient would. Use details you don’t mind creating in Halaxy, or an existing test patient.
- In the Forms List, on the form click Actions > View Responses.
- Find your test response and click View/Download.
- Scroll to the bottom of the response details to the integration logs. A successful sync is labelled Success and tells you what it did — whether it created or updated the patient, which details it matched them on, and whether the PDF was attached.

Then open the patient in Halaxy and check what the log says it did: that the details match what you submitted, and — if you enabled the PDF action — that the PDF copy of the form is attached to their file. If anything is wrong or the log says Failed, work through the troubleshooting section below — the error number tells you which part went wrong.
Remember to delete the test patient in Halaxy afterwards if you created one.
Which Halaxy fields can I map to?
You can map your form fields to any of the following fields on the Halaxy patient record:
- First name (required)
- Last name (required)
- Preferred first name
- Title
- Phone
- Mobile
- Date of birth
- Gender
- Address line 1
- Address line 2
- City
- State
- Postal code
- Country
This integration writes directly to the 15 supported patient fields listed above. Additional information, such as medical history, assessment results and consent responses, can be included in your selected PDF template and attached to the patient record.
How Snapforms matches a patient in Halaxy
Before anything is written, Snapforms looks for the patient in your Halaxy account. A patient is treated as a match when both of the following are true:
- the first name and last name are an exact match (capitalisation and surrounding spaces are ignored), and
- at least one of the date of birth, email, phone or mobile also matches.
What happens next depends on how many patients match:
| Result | What Snapforms does |
| Exactly one patient matches | Their record is updated and the PDF is attached to their file, for whichever of those actions you have enabled. |
| No patient matches | A new patient is created (if that action is enabled). If it isn’t enabled, nothing is written and an E103 error is logged against the response. |
| More than one patient matches | Nothing is changed and an E103 error is logged against the response for someone to review. This is deliberate — Snapforms will not choose between two candidate records on your behalf. |
Mapping additional identifiers can help find a patient when some existing details are outdated. It does not resolve multiple matches: if more than one patient meets the matching rules, processing stops for review.
Answer formats Halaxy requires
Most fields accept whatever your patient types. These ones have rules, so it’s worth checking your form before you go live.
| Halaxy field | What your form needs to collect |
| Date of birth | Use a Date Select field. Snapforms converts the answer to the format Halaxy expects. A date it can’t read stops the submission syncing with an E102 error. |
| Phone and Mobile | Converted to international format automatically. If your Halaxy account is in the Australia / New Zealand / other region, a local number starting with 0 is fine. If your account is in the EU / UK region, the number must already include its country code (for example +44) or it will be rejected. Numbers must be between 7 and 15 digits. |
| Gender | Snapforms sends the answer through as the patient wrote it, converted to lower case. It applies no list of its own, so whether a value is accepted is decided by Halaxy. Halaxy’s API documents male, female, other and any custom gender value configured in your practice, and notes that this field carries Legal Sex where that setting is enabled (see Halaxy’s Patient API reference and their “Manage gender diversity settings” help guide). If you use a Choose One field, match its options to the values your own Halaxy account accepts. Capitalisation doesn’t matter, so “Male” and “Female” are fine, but a value Halaxy doesn’t recognise — “M”, “F” or “Prefer not to say”, unless you have set those up as custom genders — comes back as an E104 or E105 error. |
| Country | Snapforms recognises Australia, New Zealand, United Kingdom, UK, Great Britain, United States and USA and converts them for you. Any other country must be given as its two-letter code (for example SG or IE). |
| Address line 2 | Only sent when Address line 1 is also mapped and answered. |
| Title | Added to the front of the patient’s name in Halaxy (Mr, Mrs, Dr and so on). |
| Preferred first name | Stored alongside the patient’s legal name rather than replacing it. |
Mapping two form fields to one Halaxy field
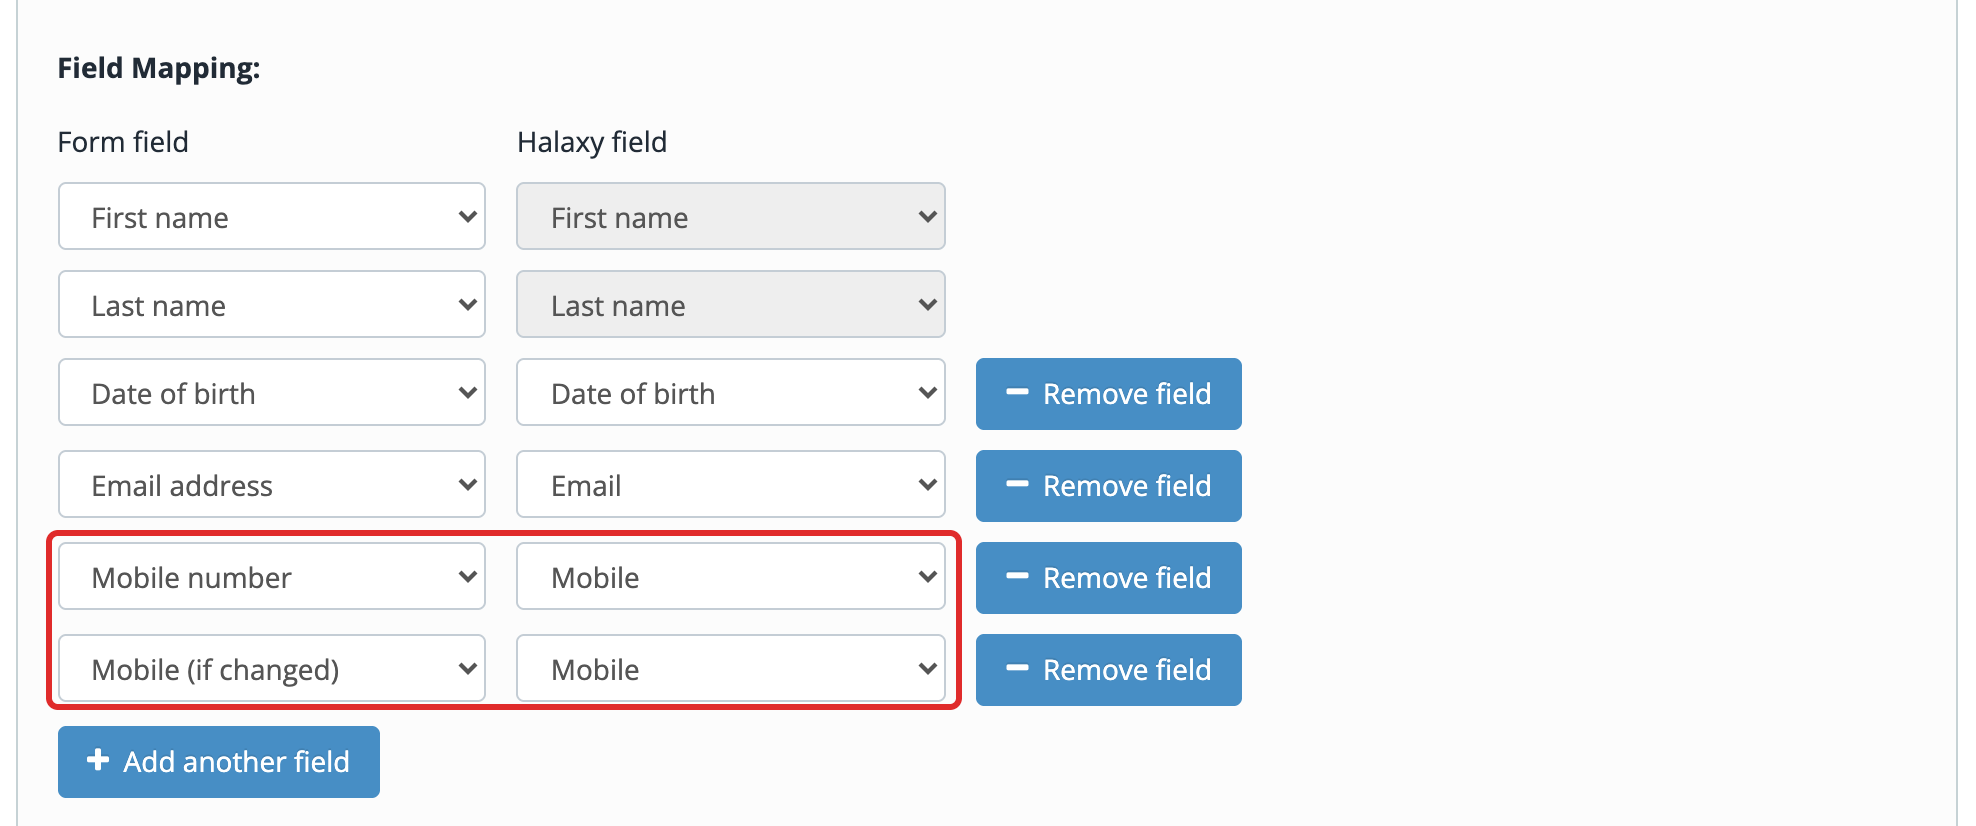
You can map more than one form field to the same Halaxy field. Unlike our Cliniko and Nookal integrations, Halaxy does not join the answers together — it uses the last mapped field that the patient actually answered.
This is useful when the same piece of information can come from more than one question. For example, if your form asks for a mobile number and then asks again on a later page for patients who have changed numbers, mapping both to Mobile means the later answer wins when it’s filled in, and the earlier one is used when it isn’t.
If you want two answers to appear together in Halaxy, combine them in your form first — for example with a short-code — and map that single field instead.
Troubleshooting
If the integration fails to create or update a file in your patient management system, you can check the integration result and logs in the form’s responses.
- In the Forms List, on the form click Actions > View Responses. A response that didn’t sync is flagged with a red icon next to its date — hover over it to see which integration failed.

- For more details, click View/Download.
- Scroll to the bottom of the response details to the integration logs.


Halaxy errors are numbered, which makes them quicker to act on:
| Error | What it means and what to do |
| E101 | Snapforms could not connect to Halaxy. Check that a connection is selected on the form, and that the Client ID, Client Secret and Region are still correct. Also check the API key still exists in Halaxy under Settings > Integrations > External, that it has the Patients permissions listed above, and that your Halaxy API subscription is still active. |
| E102 | A mapped answer is missing or in a format Halaxy won’t accept — most often a date of birth, a phone number or a country. Check the response against the answer formats above, then check the field mappings on your form. |
| E103 | Either no Halaxy patient matched, or more than one did. Nothing was changed. If you expected a new patient to be created, enable the “Create a new Halaxy patient…” action. If more than one matched, review those records in Halaxy: they may be duplicates of the same person, or they may be two different patients who share a name. Merge only the ones you have confirmed are the same person, then re-send the response. |
| E104 | Halaxy refused to create the patient. The log will include Halaxy’s own reason — usually a value it won’t accept, such as a gender option that isn’t on its list. |
| E105 | The patient was found but Halaxy refused the update. As with E104, the log carries Halaxy’s reason. |
| E106 | There was no patient record to attach the PDF to, because the patient wasn’t matched and wasn’t created. Resolve the E103 or E104 error above it and the attachment will work. |
| E107 | The PDF could not be generated or attached. Re-select the PDF templates in the integration settings and save the form. PDFs over 200 MB are rejected by Halaxy. |
How to re-send a response to Halaxy
Once you’ve fixed the cause — corrected a field mapping, merged a duplicate patient in Halaxy, saved new credentials — you can send the response through again. There’s no need to ask the patient to fill in the form a second time.
- Open the response from Actions > View Responses > View/Download.
- At the top of the Response Details window, click Resend.
- Choose Halaxy from the list, then click Yes, resend to confirm.

The response is processed again using its current answers and your current integration settings. Refresh the integration logs to see the result. You can only resend the same integration for the same response once every 30 seconds.
Note: the Resend menu only lists integrations that are currently enabled on the form, so if Halaxy isn’t there, check the integration is still ticked in the form settings.
If you’re unable to resolve any issues, please get in touch with us for assistance.